Caltrans' new version of the standard specifications is finally ready for distribution! The last edition was from 2006 and the new standards will be labeled 2010. They can be found in pdf form at http://www.dot.ca.gov/hq/esc/oe/standards.php but they will not be published in the handy reference books that we all know and love until later this year. Until they are published in book form, Caltrans will continue to advertise projects using the 2006 standards. Once the 2010 version is published Caltrans will begin a transition period where they will ween out the contracts that use the 2006 standards for one year, after which they will only bid projects using the 2010 standards.
A quick guide/faq to the new standards can be found at http://www.dot.ca.gov/hq/esc/oe/2010/docs/quick_guide.pdf
Happy reading!

Tuesday, May 31, 2011
Stock Pile Segregation III-Building Stock Piles
My last two posts focused on avoiding segregation during production and load out. This post will focus on avoiding segregation and degradation when moving material to a new location and building new stock piles.
When you are building aggregate stock piles you must be aware of the potential for segregation just as you do during production and load out. The taller the stockpile is, the larger the chance for segregation, especially if you are stockpiling in a cone shape. If you have ample floor space you should first consider a large stockpile that takes up a lot of surface area but is not very tall. To make this type of stockpile you should be aware of how you are dumping the material to form the stock pile.
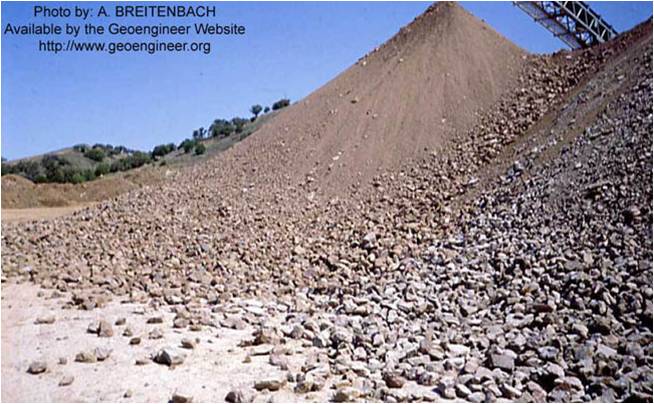
When using equipment that does not have a tall reach, like haul trucks, the operator should be sure that they do not dump the aggregate material onto the existing stock pile's side. If the material is dumped on a sloped side of the stockpile, the larger rocks will tend to roll down the side of the stockpile and collect around the toe, just like they do in production. Each time you have a new truck load, the truck should dump its load just in front of the stockpile to create a new cone of material. A loader can come in after the truck to buck up the pile and move it all closer together if necessary. This is shown in the picture below:

 Progressive stock piles are stockpiles that are made by adding one layer of aggregate at a time. The haul truck dumps its aggregate material on the ground and a dozer pushes it up onto the stockpile at at slope no greater that 3:1 to prevent the larger rocks from rolling down the stockpile. It is important that the dozer pushes the material up the stockpile to just before the edge of the stock pile on the other end. If the dozer pushes the material over the edge of the stockpile you will have the same segregation problems that you are trying to avoid by not using a cone shaped pile. When choosing a dozer to work on your stockpile, opt for the lightest one that you own. The weight of heavy equipment on aggregate materials can crush the aggregates and make the product finer. This is also the reason that a track dozer is recommended over a loader for this application. The tracks of the dozer distribute the weight of the equipment over a larger surface area than four wheels does which in turn reduces the crushing force applied to the stock pile at any one time. Because of this propensity to crushing, it is recommended that if you can avoid driving equipment on your stockpiles you should.
What other stock piling solutions have you found?
When you are building aggregate stock piles you must be aware of the potential for segregation just as you do during production and load out. The taller the stockpile is, the larger the chance for segregation, especially if you are stockpiling in a cone shape. If you have ample floor space you should first consider a large stockpile that takes up a lot of surface area but is not very tall. To make this type of stockpile you should be aware of how you are dumping the material to form the stock pile.
When using equipment that does not have a tall reach, like haul trucks, the operator should be sure that they do not dump the aggregate material onto the existing stock pile's side. If the material is dumped on a sloped side of the stockpile, the larger rocks will tend to roll down the side of the stockpile and collect around the toe, just like they do in production. Each time you have a new truck load, the truck should dump its load just in front of the stockpile to create a new cone of material. A loader can come in after the truck to buck up the pile and move it all closer together if necessary. This is shown in the picture below:

If you do not have the luxury of endless stock pile space (as most of us do not) you will probably want to make a taller stockpile to take advantage of the storage potential. One great way to do this is with progressive stock piles like the one shown in the picture below.
What other stock piling solutions have you found?
Friday, May 27, 2011
Stock Pile Segregation II-Fluffing the Pile
My last post focused on combating segregation of aggregates in production but this post will primarily focus on how to deal with segregation of a stockpile after you have already made the product.
Lets say you have a segregated aggregate base pile like the one I showed you in my last post. Your boss probably won't be keen on throwing out all of that material and starting over so how do you fix the problem once you already have a segregated stockpile? I'd say with a good loader operator and a few extra minutes before load out. When moving a stockpile to another location or loading material out of a stockpile and into trucks, the loader operator can perform an action called "fluffing the pile" to mix the material back up and de-segregate it. Your plant may call this by another name, I've heard it called "bucking the pile" and "mixing the pile" as well and I'm sure there are a hundred other names to it depending on where the plant is located. The important thing is how it is done.
The loader operator will take three vertical cuts of the stockpile. His first cut will be in the middle of the pile and then to the right or left of the first cut as seen in the picture below. It is tempting to take only one big cut to fill the loader's bucket but the more cuts you take, the less segregated the load will be.


This is only one way of fixing a segregation problem at an aggregate plant and I'd love to hear about some of your solutions as well! In keeping with the trend, my next post will focus on how to move and stockpile aggregates without segregation or degradation.
Lets say you have a segregated aggregate base pile like the one I showed you in my last post. Your boss probably won't be keen on throwing out all of that material and starting over so how do you fix the problem once you already have a segregated stockpile? I'd say with a good loader operator and a few extra minutes before load out. When moving a stockpile to another location or loading material out of a stockpile and into trucks, the loader operator can perform an action called "fluffing the pile" to mix the material back up and de-segregate it. Your plant may call this by another name, I've heard it called "bucking the pile" and "mixing the pile" as well and I'm sure there are a hundred other names to it depending on where the plant is located. The important thing is how it is done.
The loader operator will take three vertical cuts of the stockpile. His first cut will be in the middle of the pile and then to the right or left of the first cut as seen in the picture below. It is tempting to take only one big cut to fill the loader's bucket but the more cuts you take, the less segregated the load will be.

To take these cuts, the loader operator should place his bucket as low as possible in the pile without touching the ground. It is important that the loader bucket does not scrape the ground when taking material from a stockpile. The floor of your plant is made of a different type, size, and gradation of material than your stockpile and if the bucket of the loader scrapes the ground, the the material in his bucket is being contaminated. It should be noted as well that the lower 2 ft of the stock pile can also be contaminated with the native soil. This is especially prevalent in clean, fine products such as concrete sand. Mud can actually rise up into the stockpile, contaminating it and lowering the cleanliness of the material in the lower section of your stockpile. This is one reason that many plants are moving towards concrete or paved floors under their wash plant stockpiles.
Once the loader bucket has been placed near the bottom of the stockpile, the loader operator should push the bucket into the stockpile and pull it upwards simultaneously towards the top of the pile as shown in the picture below. It is important that the operator does not just skim the outside of the pile and that he pushes the bucket into the pile as deep as possible in order to ensure that the coarse material on the outside and the fine material on the inside are both collected.

After each cut, the loader will redeposit the material back on the side of the pile and start on the next section. This is an easy way to mix the material together before loading it into trucks to ensure that you have a homogeneous product. When your loader is loading trucks he should be sure to move around the outside of the pile and not just dig further and further into one section. In addition to safety concerns, the further into the center of the pile you go, the finer the material will be so it is important to continuously mix the outside of the pile with the inside as you move around the outside of the stockpile. The loader should start in the middle of one side of the stockpile, fluff that section, and move to each side as he loads trucks in order to make a full 180 degree arc along the side of the pile as shown in the picture below. This keeps your loads consistent because you are scooping similar material on each load and not sending out one truck of extremely coarse product followed by a truck of extremely fine material. It is also important to continue fluffing the stock pile as the loader moves to untouched parts of the pile, these sections need to be mixed just like the first section did.
This is only one way of fixing a segregation problem at an aggregate plant and I'd love to hear about some of your solutions as well! In keeping with the trend, my next post will focus on how to move and stockpile aggregates without segregation or degradation.
Tuesday, May 24, 2011
Stock Pile Segregation
Stockpiling aggregate in a large conical pile can create segregation. The finer materials will stay in the middle of the pile where they stick when they fall from the conveyor. The coarser materials will roll to the outside of the pile as shown below:
Segregation is especially prevalent in materials with a broad range of aggregate sizes (like base rock) or aggregates that are gap graded (like many perms). Why does segregation matter to you? In hot mix asphalt (HMA), segregation in the aggregates can lead to inconsistent feeds into the hot plant, and as you all know...junk in...junk out. In Caltrans QC/QA jobs, the pay factor is based partially on consistency. Even if you are within the specification band the entire time you are producing mix, if the gradation of the material varies by 5-6% you can end up paying the state a penalty fee instead of making a bonus off of the job. In addition to these potential costs, having poor gradations in your HMA can lead to pavement problems as well. If the gradation is too coarse (you pulled the aggregate only from the outside of the stockpile) your pavement can have poor compaction, raveling, and/or rutting. If the gradations are too fine (you pulled the aggregate only from the inside of the stockpile) your pavement can have flushing and/or bleeding problems.
In concrete products, aggregate segregation can also lead to inconsistent feeds into the batch plant. If your gradations are too coarse, the concrete products can be hard to place and the strength can decrease. If the gradations are too fine, the shrinkage increases, water demand goes up, you need more cement, and/or the strength decreases.
So how do you combat segregation? One way is to use telescoping and/or radial conveyors. The smaller the distance that the material has to fall before it hits the top of the pile, the smaller the chance there is of the material segregating. By utilizing a telescoping conveyor you can ensure that you are discharging the aggregate close to the top of the stock pile at all times. In addition, you can use radial conveyors to create layered stockpiles, reducing the cone shape that seems to encourage segregation. This type of stockpile is shown below:

Have you used another type of equipment that helped you prevent segregation at your plant?
Tuesday, May 17, 2011
Select the Right Infrared Equipment
Infared equipment is gaining hype in the construction industry today. This article gives some insight on the different types of infared machines out there and which ones you might want to purchase for your company.
http://www.forconstructionpros.com/publication/article.jsp?pubId=2&sms_ss=blogger&id=20331&at_xt=4dd32cba7fa5029c%2C0&pageNum=1
Does anyone own any of these? What has been your experience with it?
http://www.forconstructionpros.com/publication/article.jsp?pubId=2&sms_ss=blogger&id=20331&at_xt=4dd32cba7fa5029c%2C0&pageNum=1
Does anyone own any of these? What has been your experience with it?
Sunday, May 15, 2011
Warm Mix Asphalt and Michigan DOT
Warm mix asphalt is a product that is becoming a popular topic on construction products all over the state. The following videos are a joint project by the Michigan DOT and National Center for Asphalt Technology, in which they talk about a couple of warm mix additive products, Advera & Evotherm, and how warm mix asphalt compares to hot mix asphalt.
What are your experiences with warm mix asphalt?
What are your experiences with warm mix asphalt?
Friday, May 13, 2011
Asphalt Binder
Over the last few years I've heard a lot of differing opinions about asphalt binder. I say opinions because I don't think that most of these people are basing their information on a scientific study or experiences that they've had themselves. The asphalt binder information floating around out there seems to be a lot of hearsay and myths. Hopefully I can help set some of those myths to rest.
As background information I should probably tell you that there are several different types of paving grade (PG) asphalt binders. In 2006, Caltrans switched to the PG grading system from the Aged Residue (AR) grading system. If you see a grading such as AR-4000, this is the old system of asphalt gradings. The standard asphalt binders used in dense grade asphalts in California today are known by the following names: PG 64-10, PG 64-16 & PG 70-10. The numbers in these names correspond to temperatures in degrees Celsius. The numbers are a range at which the asphalt will maintain its' quality when laid down in pavement. For example, PG 64-10 should be used in regions that the ambient temperature will be between 64 C and -10 C.
To obtain different performances of asphalt binder, asphalt binder is made with different gradations of particles. Yes, the gradations are similar to those that we use to define aggregates. Asphalt binder is made up of varying sizes of particles and can be processed to achieve a specified gradation just as aggregates can. For each of the Caltrans PG grades there are different specifications for the binder's gradation. This brings me to myth #1.
Myth 1: PG 64-10 and PG 64-16 are the same thing and are interchangeable
The PG 64-10 and PG 64-16 have gradation specifications that overlap each other, just as the old section 39, 1/2" Maximum Medium and new section 39, 1/2" HMA specifications overlap each other. However, this does not mean that in every case both PG 64-10 and PG 64-16 are the same oil. This myth stems from the fact that several asphalt refineries produce a product that meets both specifications. Not all refineries do this so be sure that if you are planning on using them interchangeably that your refinery does not make them as two different products.
Myth 2: PG 64-10 is the same no matter what producer you buy it from
Refineries have a specification range that they can produce their asphalt binder within so chances are that each refinery has slightly different gradations of the same product. Slight changes in gradation might not bother you but there are other inherent properties that differ between refineries as well. Refineries do not all make their products from the same crude oil source. Similar to how aggregates vary in various rock properties depending on the deposit, crude oil can vary as well. Even though all of the refineries may be producing within the same specification, their asphalt binders can give you varying performance results; some may last longer, others may be stronger, while still others may perform better in extreme temperatures.
One thing to consider when you are choosing an asphalt binder supplier is how "clean" their product is. Have you ever seen the Shell gasoline commercials where they show what an engine looks like with their product and what it looks like when using another brand? In the commercial the Shell engine is relatively clean but the other company's engine has a build up of material or "engine gunk". The same thing can happen with asphalt binders. Over time your asphalt binder can deposit what the industry calls coke, in your asphalt tanks and lines. This can slow down your disbursement from the tanks as well as reduce your ability to heat the asphalt efficiently. Even though two different binders may meet the same specification, there are also other factors that might save you money as well.
Myth 3: You can use different producers' binders in the same mix design with no changes
Once again I'd like to point out that there is a specification range, not a specific target, that asphalt binder is produced around. From personal experience I can tell you that the same grade of asphalt binder from different producers can give you varying asphalt content requirements in your mix designs. These differences can be up to a 0.3% difference in oil content which is a considerable cost savings for your asphalt plant. Oil contents in asphalt mix designs are determined by a variety of quality results but generally it is the percentage of asphalt binder the mixture needs in order to achieve 4% air voids in the mixture. If one brand of binder takes up more volume than another then you will need less of that binder to achieve the same results.
If you have the time and the money, take a look at your mix designs and do a couple of verification points with different producers' asphalt binders. You might find that although one brand has the cheapest price, it is not the one that will save you the most money overall if you factor in reduced oil content in your mixes and reduced maintenance fees to your plant.
I hope that I've helped to clear up a couple questions in your minds about asphalt binders. What other myths are you curious about? Do you have any myths that you can de-bunk for us?
Wednesday, May 11, 2011
Gradation Errors
The gradation test is the cornerstone for quality control testing. It is the most requested test and in many ways the most useful test in determining if a product will meet the minimum requirements needed for a job. But what happens when you get a bad test result and the gradation is out of specification? There are two places that you should check, in the laboratory and in the plant.
The laboratory can be easily checked for deficiency while testing the product. As I mentioned yesterday, there are several ways that material can be screened for a gradation test but the same general principal remains. Layers of screen cloths are set up, with the largest on top and decreasing in size as they go down. Material is deposited on top and shaken for a designated amount of time so that the smaller material can fall through each screen. In a perfect test, each screen would only retain the size material between that screen and the one above it, i.e. a #8 screen would only retain material sizes between #8 and #4. However, this does not always happen and you can have smaller sized material retained on each sieve because of inefficient screening.
Think about it this way, imagine you're coming out of a baseball game at the end of the game. There are tons of people crowding through just a few doors, which slows down the process and it takes longer for people to move through the doors than if you'd left earlier in the night. If you'd left at the 4th inning you probably would have only tried to go through those doors with one or two people so getting to and through the doors takes a lot less time. It's the same way with screening. The gradation shaker is calibrated to shake for a certain amount of time, but if there is too much of one size material in your sample, there are more particles trying to get through the screen and it will take longer to shake them through to the next screen cloth. When removing the rock from each sieve at the end of the test, the technician should be looking to see if the amount of rock on the sieve covers the entire screen cloth or not. If it does, it is possible that the material needs to shake for a longer period of time or that the sample should be broken into two batches instead of one.
Also while emptying the sieves, your technician should be looking at their screens to make sure there is no damage to the screen cloth that could allow larger material to pass through the screen than intended (like a hole). Both of these double checks should take your technician less than 5 seconds and could make a huge difference in your test results.
If you're confident in the laboratory's test results the next step is to go to the plant and see if the same issues exist on the screens there. When the screen is not running you should take a look at the screen clothes and be sure that there are no holes in the screen. This is a good practice for the plant operator to perform at the beginning of his shift before he turns the plant on. Holes in screens will typically cause a coarser gradation in the product that is directly below the damaged screen, although if the hole is big enough, the extra material could overload the screen deck below and cause a finer gradation instead of a coarser one.
Plant screens work identically to that of those in the laboratory but instead of material being deposited on top of a screen stack and shaken until it passes through, the material is deposited on the screen and moved down the screen cloth to the end. How fast the material moves down the screen cloth depends on how fast you are running the plant and this will regulate how much time the material will have in order to pass through each of the screen cloths. You can have the exact same problem of material not passing through the screen cloths in the plant as in the lab if the material doesn't have enough time to get through due to too much material on the screen cloth. While you're at the plant you should take a look at how much material is on each screen deck at any given time and look to see if any of the screens look overloaded with material. The overloading will cause finer gradations in the products that come from your upper screen decks and coarser gradations in the products that come from your lower screen decks. To reduce overloading you can reduce the amount of material being fed onto the screen, but this will lower your tons per hour of output. Instead, you could also reduce the angle at which the screen deck is slanted at. The steeper the angle on the screen deck, the faster the material will move down the screen and the less time it will have to move through the screen cloths. Reducing the angle will give the material more time to shake through the screen.
Overloading and holes on a screen are not the only things that can change your gradations but are easy starting points before you delve further into the problem. What other causes have you found for poor gradation results?
Monday, May 9, 2011
Gradations and Shakers
We've gone over what a gradation report means but you might ask yourself what exactly the gradation test is. In the laboratory the technician weighs out a predetermined weight of aggregate and it is separated by sieve sizes. There are several ways to do this. The least used of these methods is to shake the material over each sieve by hand. This can be extremely time consuming and is absolutely no fun for your technicians. Most laboratories use machines to mechanically shake the sieves. This is not only faster but more reliable since the machine is much better at shaking the sieves at a constant rate than your technician is.
Coarse Aggregate samples are most commonly shaken on a Gilson TS-1 testing apparatus as shown below.
 Coarse samples contain a larger volume of rock than fine aggregate samples do which means that you need more surface area on the screens to assure that all material has the ability to pass through each screen. The TS-1 has larger screen surface area than the round sieves that I will mention later. Typically you will use the TS-1 to screen rock from 3" to #8. Each of the trays shown in the picture above has a screen cloth attached to it, with the largest screens on the top and decreasing in size as they go down. A sample is deposited in the top of the machine and the sample is shaken for a predetermined amount of time. Afterwards each tray is removed and the material retained on each sieve is weighed to determine the gradation of the sample. If you have a "mixed" sample, which means that it contains both coarse and fine aggregate (like base rock) you can still process the fines after using the TS-1. The fine materials will pass through all of the screens and collect in a pan at the bottom of the machine. By testing these fines with rounds sieves you can determine the rest of your gradation.
Fine aggregates are typically sieved using round sieves which are are usually 8" or 12" in diameter and act in the same way as the screen trays in the TS-1. Personally I prefer the 12" sieves because there is more surface area but machine constraints and cost are usually deterrents for most labs. There are several different types and brands of shakers that can be used for shaking round sieves. Several types can be seen below:
The Retsch shaker moves the sieves in three directions in order to facilitate the material passing through the sieves.
The Ro-Tap has an arm that hits the top of the sieve stack in order to "pop" the material off of the screen and move the sample around the screen cloth.
The Mary-Ann hits the sieves from the side which "pops" the material much like the Ro-Tap but the impact also rotates the sieves slightly each time.
You probably won't see many simple shakers like the Retsch and will most likely be at a laboratory that uses either the Ro-tap or Mary-Ann style of shakers. My personal preference is the Mary-Ann style shaker for a variety of reasons. This is the quietest of all of the shakers because it has its own enclosure. Don't get me wrong, it still makes a lot of noise but I feel that it is quieter than the other types of shakers. In addition, it allows for either 8" or 12" sieves which gives you the ability to process samples more efficiently and/or faster. I also prefer this setup because it does not damage the sieves. It's been my experience that the Ro-Tap can damage your sieve frames if they are not set correctly when you start the machine. The vertical impact to the sieves from the Ro-Tap arm can bend your frames if they are not perfectly level. The bent sieves can become difficult to dislodge from each other and will either slow down your technician or force them to contaminate a sample. The Mary-Ann on the other hand uses a horizontal impact that is not as strong as the Ro-tap's impact and does not seem to damage the sieves.
Round sieves can sieve material from 2" down to #200 but will usually only be used for 3/8" down to #200s because the larger size rock will need more surface area to sieve efficiently. The 12" diameter sieves can help you sieve larger rock because of the greater surface area and it can be possible to sieve up to 1" without an issue of efficiency with these sieves.
Which apparatus do you use? What do you like/dislike about it?
Coarse Aggregate samples are most commonly shaken on a Gilson TS-1 testing apparatus as shown below.
Fine aggregates are typically sieved using round sieves which are are usually 8" or 12" in diameter and act in the same way as the screen trays in the TS-1. Personally I prefer the 12" sieves because there is more surface area but machine constraints and cost are usually deterrents for most labs. There are several different types and brands of shakers that can be used for shaking round sieves. Several types can be seen below:
 |
| Retsch SS-200 Sieve Shaker |
The Retsch shaker moves the sieves in three directions in order to facilitate the material passing through the sieves.
 |
| W.S. Tyler Ro-Tap Sieve Shaker |
The Ro-Tap has an arm that hits the top of the sieve stack in order to "pop" the material off of the screen and move the sample around the screen cloth.
 |
| Mary Ann Sifter |
The Mary-Ann hits the sieves from the side which "pops" the material much like the Ro-Tap but the impact also rotates the sieves slightly each time.
You probably won't see many simple shakers like the Retsch and will most likely be at a laboratory that uses either the Ro-tap or Mary-Ann style of shakers. My personal preference is the Mary-Ann style shaker for a variety of reasons. This is the quietest of all of the shakers because it has its own enclosure. Don't get me wrong, it still makes a lot of noise but I feel that it is quieter than the other types of shakers. In addition, it allows for either 8" or 12" sieves which gives you the ability to process samples more efficiently and/or faster. I also prefer this setup because it does not damage the sieves. It's been my experience that the Ro-Tap can damage your sieve frames if they are not set correctly when you start the machine. The vertical impact to the sieves from the Ro-Tap arm can bend your frames if they are not perfectly level. The bent sieves can become difficult to dislodge from each other and will either slow down your technician or force them to contaminate a sample. The Mary-Ann on the other hand uses a horizontal impact that is not as strong as the Ro-tap's impact and does not seem to damage the sieves.
Round sieves can sieve material from 2" down to #200 but will usually only be used for 3/8" down to #200s because the larger size rock will need more surface area to sieve efficiently. The 12" diameter sieves can help you sieve larger rock because of the greater surface area and it can be possible to sieve up to 1" without an issue of efficiency with these sieves.
Which apparatus do you use? What do you like/dislike about it?
Sunday, May 8, 2011
Low Sand Equivalent Solution 1
Are you having issues with low Sand Equivalents? One way to combat a high #200s count is by adding larger rock to the product. The Sand Equivalent test is a comparison of the volume of silty clays to the volume of sand in your sample. Since larger rock takes up a larger volume of space than finer rock, i.e. silty clays, it goes to say that by increasing the percentage of larger rock, you will improve your sand equivalent. The larger the rock the faster this will improve your Sand Equivalent so if you have the room in your specification range, adding #8 sized rock to your product will improve your sand equivalent the most but adding #16s, #30s, and #50s will all help as well. Just remember that the sand equivalent test is performed on the material smaller than the #4 sieve, so adding rock any larger than the #4 sieve will not help your sand equivalent.
What other solutions have you found to a low sand equivalent?
What other solutions have you found to a low sand equivalent?
Friday, May 6, 2011
Caltrans RSP Samples-June 2011
Caltrans will be issuing a new RSP sample in June 2011. They will be testing each laboratory on CT 202 and CT 217. You are only required to participate if your laboratory performs the 202 and/or 217 tests. If you have not received notification about this testing from Caltrans yet I would recommend that you email Caltrans.reference.sample.program@dot.ca.gov to assure that you are enrolled in the program.
Good luck to everyone!
Good luck to everyone!
Percent Passing Vs. Percent Retained
Most of the time when you get a gradation test report the test results will be shown as percent passing. But what does that mean? Percent passing is the amount of the sample that PASSES the sieve in question. So if you see the following gradation:
#4 100%
#8 55%
#16 23%
You can determine that 55% of the sample is smaller than the #8 sieve because 55% of the sample passed through the #8 sieve.
Another way that a gradation result can be shown is percent retained. This report shows you how much material is RETAINED on the sieve in question. So for the same sample shown above you will see the following gradation results:
#4 0%
#8 45%
#16 77%
This shows that 77% of the sample is larger than the #8 sieve because 77% of the sample was retained on that sieve. This is a cumulative test result so anything that was retained on the #8 sieve is also included in the amount of material that was retained on the #16. The percentage refers to ALL of the sample that is larger than that sieve, not just the amount of material between that sieve and the sieve above it.
Which brings me to Individual Percent Retained. Individual Percent Retained is the amount of material that is retained on an individual sieve, between the sieve above and the sieve in question. So referring to the same sample as before you would see the following gradation report:
#4 0%
#8 45%
#16 32%
This shows that there is 32% individually retained on the #16 sieve because 32% of the sample is smaller than the #8 sieve but larger than the #16 sieve.
As you can see it is extremely important to know what type of gradation you are looking at because the percentages can be very different. 99% of the time in the construction industry you will see gradations shown as percent passing. For those of you who are new to gradations this might seem counter intuitive and you might naturally want to think in terms of individual percent retained. I completely understand because I was the same way for the first month or so but I would highly recommend that you start training yourself to understand and use percent passing. This is how the industry speaks to each other and if you are constantly converting gradations to individual percent retained you will really struggle to keep up. Don't get me wrong, both individual percent retained and percent retained are extremely useful in their own ways but usually only for special projects and most of you will probably never have to use them.
Quality Control, in its own way, is a new language to most of the industry so don't feel like you have to understand it all at once. Make sure to clarify by asking questions and you'll be surprised by how many people may be having the same problems as you!
Wednesday, May 4, 2011
Aggregate Sizes
Today I thought I'd talk about the different size classifications of aggregates. There are infinite size distributions of aggregates. These sizes can either be referred to in metric or English units. At one time Caltrans tried to switch over to metric units but have since switched back to English units. However, you will probably see specifications and results in both different sizing types. The following is a simple conversion chart for your use:
I'm sure you're wondering why the English units have numbered sieves. These numbers correspond to how many of that size sieve squares can be lined up to make a 1" line. So a #4 sieve screen uses 4 squares to make up a 1" line. You can see what I mean in the picture below.

Aggregate materials are generally broken up into two classifications of size: fine and coarse aggregate. Coarse aggregates are typically sizes larger than the #4 sieve. Fine aggregates are typically sizes smaller than the #4 sieve. What people refer to as "dust" is typically aggregate smaller than the #200 sieve.
Simple enough right? Any questions?
English | Metric |
1" | 25mm |
3/4" | 19mm |
1/2" | 12.5mm |
3/8" | 9.5mm |
#4 | 4.75mm |
#8 | 2.36mm |
#16 | 1.18mm |
#30 | 0.6mm |
#50 | 0.3mm |
#100 | 0.15mm |
#200 | 75um |
Aggregate materials are generally broken up into two classifications of size: fine and coarse aggregate. Coarse aggregates are typically sizes larger than the #4 sieve. Fine aggregates are typically sizes smaller than the #4 sieve. What people refer to as "dust" is typically aggregate smaller than the #200 sieve.
Simple enough right? Any questions?
Tuesday, May 3, 2011
Cleanliness
In California there are two tests to check the cleanliness of your aggregate materials. The Sand Equivalent (SE) test is used on fine aggregates (smaller than #4 sieve) and the Cleanliness Value (CV) test is used on coarse aggregates.
As I've mentioned before, the SE test determines the ratio of sand vs. clay and silty materials. The simple way for me to explain the test is: the test material finer than the #4 sieve is placed in a cylinder with a flocculent and agitated to remove the clay-like coatings from the sand particles. More flocculent solution is added to the cylinder in order to suspend the clay and silts above the sand. After a time period, the height of the sand and the height of the "clays" are measured and compared to each other as a proportion to each other creating the SE result. A higher SE value means that there is more sand than clay and silty material and is typically preferable. A lower SE value means that there is more clay and silty material than sand. So that you have a frame of reference, the Caltrans concrete sand specification requires a minimum SE value of 71 which means that 71% of the material is made up of sand and 29% is made up of potentially detrimental clays and silts. Hot Mix Asphalts typically require a minimum SE of 47.
So why does the SE test matter? In hot mix asphalt, clay-like and silty fines can coat aggregate particles and prevent proper asphalt binder to aggregate bonding. That means that your mix could have problems with moisture damage and stripping. Excess dust or fines, as shown with the SE test can also lead to a lake of stability with rutting or shoving in the mix. In non-hot mix asphalt products, fines can reduce permeability and drainage. If the materials are of a clay like material and are of an expansive nature, the material can actually expand when it encounters water. This can lead to a load of problems but it all differs on what you are using the material for. If you are using it for pipe bedding, the expansion might put too much pressure on the pipe and burst it. If you are using it as a subbase, the expansion can push up the road above it and cause cracking in the concrete or asphalt above.
The CV test is a Caltrans test method and there is not an equivalent ASTM test. It determines the amount of clay-sized material clinging to the coarse aggregate. The simple way for me to explain the test is: the coarse aggregates are placed in a bucket with water and shaken to knock off any fine material from the rocks. The water/fines are then filtered through a #200 sieve and then poured into a graduated cylinder with a flocculent. After 20 min the height of the material in the cylinder is measured and multiplied by 100. This is the Cleanliness Value. High values are desirable in a CV test. A CV of 100 means that there was no coating on the coarse aggregates. Typically you will see the CV of hot mix asphalt aggregates to range between 80 and 100.
So why does the CV test matter? Dirty coatings on aggregate surfaces can prevent the asphalt binder from properly adhering to the aggregates, leading to an increased potential for moisture damage. This is especially true when clayey fines coat the aggregates. Fine coatings also will degrade faster than the rock itself and cause a loss of structural support and prevents binder-aggregate binder which causes raveling. In addition to all of that, excess dust can also absorb the asphalt binder making the binder requirement for a mix higher than it needs to be.
There are times when fines can be desirable in your product but many of the uses for aggregates now adays specify a clean product. The SE and CV tests are fast and easy ways of determining that.
Monday, May 2, 2011
Batch Plant Sampling
You might be seeing the theme as we go along but if you don't let me fill you in. A large amount of quality problems are due to simple errors. Here's another one for you.
Imagine that your batch plant's 2 bin gradations are coming back with 1/2" rock in it, even though it should be screening ALL 1/2" rock into the 3 bin. Your first reaction is that there is a hole in the screen right? That was ours too and after shutting down the hot plant, cooling it down for an hour, and then finally inspecting the screen we found that there was no hole in the screen and had just wasted a bunch of people's time and money. It was a mystery and we couldn't figure out how the rocks had gotten into the 2 bin sample but figured that there must have been some contamination at the lab. The next day we had the same thing happen. The reason? We had a new technician pulling samples from the batch plant and he wasn't instructed on how to properly pull a sample. At our plant we had four sample devices, one for each bin. The technician was supposed to prop them up next to the sample openings and put them in to the batch tower one at a time. However, to save time, the technician had thought, why not just put all of the samplers in at one time and pull them out as the bin empties to get a good sample. The problem is that there was no divider between each of the sample rails and as the 3 bin dumped material into its sampler, rocks bounced off of it into the 2 bin sampler. Simple mistake right? Luckily our plant operator saw this happening the next day that we sampled and properly educated the technician on the correct way to sample and why we sample that way.
Another thing to remember with sampling from a batch plant is that you should not leave the sampler in one place to collect the sample because the stream of material coming from the bin may be segregated with small rock on one side and large rock on the other. When you hear the bin open you should steadily push the sampler down the rails and pull it back at the same speed once it reaches the end. This will ensure that you sample the entire stream. It is not something that I can easily explain to you through a blog but be sure that you walk through it with someone who is experienced and practice a few times before you pull a sample you will be testing.
Proper sampling is the first step to having good test results. If you sample improperly it can ruin your test results and waste both your time and the time of others if they have to find a solution to fix the poor test results.
Sunday, May 1, 2011
Dust in Batch Plants
Yesterday's post got me thinking about a problem that we solved at an asphalt batch plant that I used to work with. Every so many loads they were seeing a dry batch. We checked the aggregate feed, oil system, pug mill, and computer system but couldn't find the problem. Months later after talking to a plant superintendent we figured out what the problem was...and it was simple, just like 99% of the problems you're going to see. The problem was how the mineral filler, or minus #200 fines were being distributed into the bins.
On this particular batch plant, the mineral filler was not metered in with an automation system like you might see on more modern setups. Instead, a certain portion would be pushed onto the bucket elevator with the rest of the aggregates on their way up to the top of the batch tower to be deposited onto the screen. Each bucket in the elevator did not get an equal amount of mineral filler, and often it would not deposit any mineral filler on 2-5 buckets and then a bunch of it onto one bucket. When we were looking at the system earlier we had figured that this had nothing to do with the dry loads because the screening process before the bins would distribute the mineral filler out as it was screened. However, if you've every felt mineral filler it can become very sticky if it isn't kept at a high temperature. Acting almost as a clay-like product.
Before I go any further I want to show you a diagram of what the screening process looks like and how the materials are seperated out into bins.

As you can see, the feed from the bucket elevator deposits all of the aggregate, including the mineral filler, at once onto the far left side of the screen. As the screen vibrates the rock is moved to the right along the screen and the smaller rocks fall through each deck, separating the different rock sizes. You can also see that the fine aggregates, usually rock smaller than 3/8" drops into Bin 1. Generally, the smaller the aggregate, the faster it drops through the screen decks. In other words, the mineral filler doesn't travel very far to the right along the screen. So what happens is that the mineral filler drops through to the far left wall of Bin 1 almost imediately, and does not meet very much aggregate falling onto it to push it down the bin to the bottom where the pug mill is waiting to mix the bins into hot mix asphalt. Add in the mineral filler's tendancy to become an almost sticky product and it will start to build up on the left wall of bin one, making a sort of clumb. And as we all know, eventually that clump will be heavy enough to break off of the wall and will make its way into a batch of mix. The problem is that you've had very little mineral filler in most of your batches up until now because it has been collecting in this clump, and now that the clump has made it into a batch... you have a dry batch! It was a hard thing to figure out but needed a very simple fix. To combat this problem, instead of feeding directly into the screen we installed a sort of diving board that feeds the material a foot out before it dumps it onto the screen, alowing for less of the mineral filler to build up high in bin 1. Another way to fight this is to make the left wall of your bin 1 have a steeper slant than the mineral filler needs to stick and stay there.
What other solutions have you utilized for this problem?
Subscribe to:
Posts (Atom)